
Looking to upgrade your home entertainment experience? Look no further than the mini projector! Whether you're looking to host a backyard movie night, make presentations for work or school, or simply enjoy your favorite films on a larger screen, a mini projector is a versatile and convenient tool that can help you do it all. Whether you're a first-time projector user or an experienced tech enthusiast, read on to discover the best tips and tricks for using your mini projector to its fullest potential.
Setting up your mini projector: A step-by-step guide
When it comes to setting up your mini projector, it's important to follow a few basic steps to ensure that you get the best image quality and avoid any technical issues. Here's a step-by-step guide to help you get started:
- Choose the right location: The first step in setting up your mini projector is choosing the right location for it. You'll want to find a space that's dark enough for the projector to display a clear image, so consider closing the blinds or curtains and turning off any bright lights in the room. You'll also want to ensure that there's enough space for the projector to project the image onto a wall or screen without any obstructions.
- Adjust the focus and keystone correction: Once you've chosen your location, it's time to adjust the focus and keystone correction on your mini projector. This will ensure that the image is crisp and clear, and that any distortion caused by the angle of the projector is corrected. Most mini projectors have a manual focus ring and keystone correction button or slider that you can adjust until you're happy with the image quality.
- Connect your device: Depending on the type of mini projector you have, you'll need to connect your device to the projector using an appropriate cable or wireless connection. Some common connection options include HDMI, VGA, USB, or Bluetooth/Wi-Fi. Consult your projector's manual for specific instructions on how to connect your device.
- Adjust the image size and position: Once you've connected your device, you'll want to adjust the image size and position on the wall or screen. Most mini projectors have a zoom function or a manual adjustment ring that you can use to increase or decrease the image size. You can also move the projector closer or farther away from the wall or screen to adjust the size and position of the image.
- Fine-tune the image settings: Finally, you'll want to fine-tune the image settings on your mini projector to get the best possible image quality. This may include adjusting the color, contrast, and brightness settings, as well as the aspect ratio and resolution. Most mini projectors have a settings menu that you can access using a remote control or the buttons on the projector itself.
How to connect your mini projector to a laptop, phone, or other device
Most mini projectors are designed to be compatible with a wide range of devices, including smartphones, tablets, laptops, and gaming consoles, so you can easily stream your favorite movies, TV shows, or presentations on a larger screen. Here's a step-by-step guide to help you connect your mini projector to your device:
- Determine the type of connection: The first step in connecting your mini projector to your device is to determine the type of connection that your projector supports. This will vary depending on the brand and model of your projector, but some common connection options include HDMI, VGA, USB, or wireless Bluetooth/Wi-Fi.
- Prepare your device: Before connecting your device to your mini projector, you'll want to make sure that it's properly prepared for the connection. This may involve adjusting the display settings on your device or installing any necessary software or apps to enable the connection.
- Connect the cable: Once your device is prepared, you can connect it to your mini projector using the appropriate cable. For example, if your projector supports HDMI connections, you can connect an HDMI cable from your device to the projector's HDMI port. If your projector supports wireless connections, you'll need to enable the Bluetooth or Wi-Fi feature on both the projector and your device and follow the instructions to pair them.
- Adjust the settings: Once your device is connected to your mini projector, you may need to adjust the settings to ensure that the image is displayed properly. This may involve adjusting the aspect ratio, resolution, or other display settings on your device or the projector.
- Start streaming: With your device connected and the settings adjusted, you're ready to start streaming your favorite movies, TV shows, or presentations on the big screen. Simply select the content that you want to stream on your device and enjoy the larger, high-quality image that your mini projector provides.
Best mini projectors for outdoor use and camping trips
Mini projectors are a popular choice for outdoor use and camping trips, as they allow you to enjoy movies, TV shows, and presentations on a larger screen in an outdoor setting. When choosing a mini projector for outdoor use and camping trips, there are several factors to consider, including brightness, portability, and battery life. The following introduces a SOPYOU mini projector.
- The latest upgraded native 1080P projector is an excellent option for anyone who wants to enjoy high-quality video projections at home or on-the-go. With a 1920*1080 native resolution and 9000 lumens brightness, this mini projector can provide a dynamic and color-vibrant 1080P HD projection image quality that is sure to impress. The 3LCD color calibration tech and 3000:1 high contrast can restore more intricate color details than other mini projectors, giving you a real and vivid visual experience.
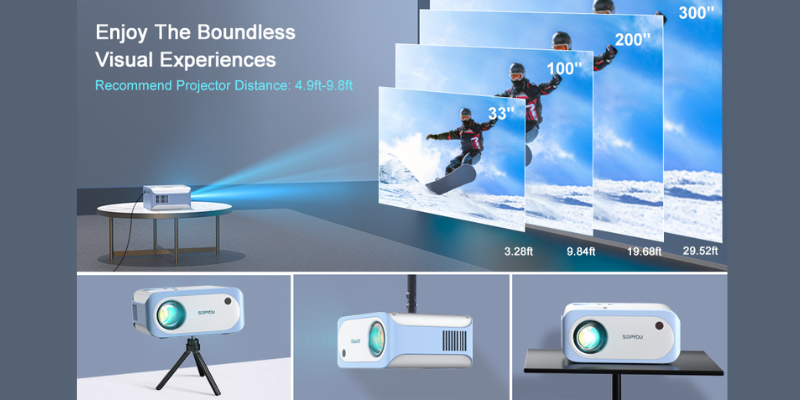
- This mini projector also offers a big screen size experience, providing a watching size from 33” to 300” with a projection distance between 1m and 6m. The best view distance is 5-10 feet, and you can adjust the focus and keystone ±15°correction to get a clear and quality image. With the remote control, you can even zoom the screen size from 50% to 100% without moving the projection screen, making it very convenient to use.
- In terms of compatibility, this full HD video projector is equipped with HDMI, Audio, AV, and USB interfaces, making it compatible with a wide range of devices, including TV Box, TV Stick, PCs, Laptops, Tablets, Smartphones, Chromecast, U Disk, PS4, Xbox, etc. While it doesn't support Netflix, Amazon Prime, Disney+, and Hulu due to copyright issues, you can still use HDMI connections such as Fire-stick, Roku stick, or other streaming devices.
- Despite its small size (5.8 * 4.8 inch), this projector is powerful enough to provide excellent audio quality with its dual 3W HiFi stereo surrounding speakers and SRS sound system. You can enjoy all the original audio fidelity with crystal clear sound quality. If you prefer a better sound experience, you can connect external speakers through the 3.5mm audio output.
Conclusion
This mini portable projector is perfect for leisure and entertainment needs, whether you're at home or in the outdoor courtyard, traveling, or camping. It makes an ideal birthday, holiday, or graduation gift for your friends, family, or children. With its advanced features, excellent compatibility, and small size, it is an investment worth making for anyone who wants to enjoy high-quality video projections on-the-go.