
Mini projectors have been gaining popularity over the years due to their portability and ease of use. They are perfect for presentations, movie nights, and even gaming. The ability to connect an iPhone to a mini projector is a great feature that allows you to enjoy your content on a larger screen. In this essay, we will explore the various ways to connect an iPhone to a mini projector and the steps to take for each method.
Connect with a Lightning to HDMI Adapter
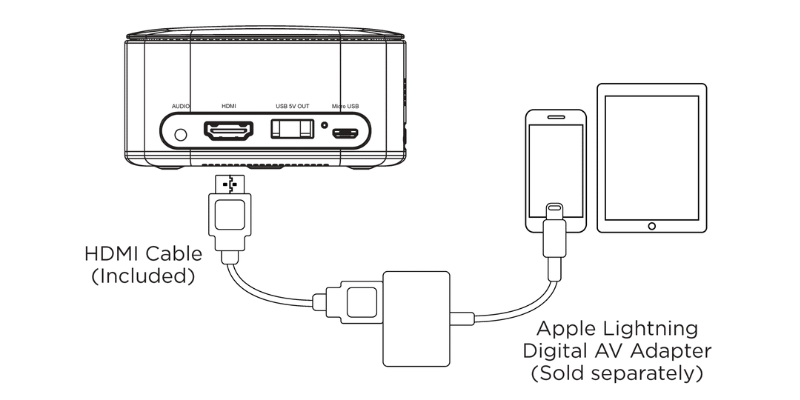
The first method of connecting your iPhone to a mini projector is by using a Lightning to HDMI adapter. This method requires an adapter that is compatible with your iPhone model. The Lightning to HDMI adapter is designed to transmit both audio and video signals from your iPhone to the projector.
Step 1: Purchase a Lightning to HDMI Adapter
The first step is to purchase a Lightning to HDMI adapter that is compatible with your iPhone model. The adapter can be purchased online or at an electronics store.
Step 2: Connect the Adapter to Your iPhone
Once you have the adapter, the next step is to connect it to your iPhone. Connect the Lightning end of the adapter to your iPhone's charging port.
Step 3: Connect the Adapter to the Mini Projector
The final step is to connect the HDMI end of the adapter to the mini projector. Ensure that the projector is turned on and set to the correct input source.
Connect with AirPlay
The second method of connecting your iPhone to a mini projector is by using AirPlay. This method requires the projector to support AirPlay technology. AirPlay allows you to wirelessly stream audio and video from your iPhone to the projector.
Step 1: Connect Your iPhone to the Same Wi-Fi Network as the Projector
The first step is to connect your iPhone to the same Wi-Fi network as the projector. This is necessary for the AirPlay technology to work.
Step 2: Turn on AirPlay
The next step is to turn on AirPlay on your iPhone. Swipe up from the bottom of your iPhone screen to reveal the Control Center. Tap on the Screen Mirroring icon and select the mini projector from the list of available devices.
Step 3: Adjust the Settings on Your Projector
Once your iPhone is connected to the projector via AirPlay, you may need to adjust the settings on the projector to ensure that the content is displayed correctly.
Connect with a Wireless HDMI Adapter
The third method of connecting your iPhone to a mini projector is by using a wireless HDMI adapter. This method requires a wireless HDMI adapter that is compatible with your iPhone model. The wireless HDMI adapter is designed to transmit both audio and video signals from your iPhone to the projector without the need for cables.
Step 1: Purchase a Wireless HDMI Adapter
The first step is to purchase a wireless HDMI adapter that is compatible with your iPhone model. The adapter can be purchased online or at an electronics store.
Step 2: Connect the Adapter to the Mini Projector
Once you have the adapter, the next step is to connect it to the mini projector. Plug the HDMI end of the adapter into the projector's HDMI input port.
Step 3: Connect Your iPhone to the Adapter
The final step is to connect your iPhone to the wireless HDMI adapter. Follow the instructions provided with the adapter to connect your iPhone to the adapter wirelessly.
Tips for Optimal Performance
While connecting your iPhone to a mini projector is a simple process, there are a few tips to ensure optimal performance.
Tip 1: Ensure the Projector is Compatible with Your iPhone
Before purchasing a mini projector, it is important to ensure that it is compatible with your iPhone. Check the specifications of the projector to see if it supports the Lightning to HDMI adapter, AirPlay, or a wireless HDMI adapter.
Tip 2: Use a High-Quality Cable or Adapter
When connecting your iPhone to a mini projector, it is important to use a high-quality cable or adapter. This will ensure that you get a clear and stable signal. Using a low-quality cable or adapter may result in poor image quality or signal dropouts.
Tip 3: Adjust the Settings on the Projector
Once your iPhone is connected to the projector, you may need to adjust the settings on the projector to ensure that the content is displayed correctly. This may include adjusting the aspect ratio, brightness, and contrast.
Tip 4: Ensure Your iPhone is Fully Charged
Streaming content from your iPhone to a mini projector can drain your battery quickly. Ensure that your iPhone is fully charged or connected to a power source to avoid interruptions.
Tip 5: Minimize Interference
Interference from other electronic devices can affect the performance of your mini projector. To minimize interference, turn off or move any electronic devices that are close to the projector.
Conclusion
Connecting your iPhone to a mini projector can provide a larger screen for presentations, movies, and gaming. There are three methods of connecting your iPhone to a mini projector: using a Lightning to HDMI adapter, AirPlay, or a wireless HDMI adapter. Each method has its own advantages and disadvantages. Before deciding which method to use, it is important to consider the compatibility of your iPhone and the projector.
To ensure optimal performance, it is important to use a high-quality cable or adapter, adjust the settings on the projector, ensure your iPhone is fully charged, and minimize interference. By following these tips and the steps outlined in this essay, you can easily connect your iPhone to a mini projector and enjoy your content on a larger screen.